Converting Paprika 3 Recipes to Markdown

Update:

I’ve completed this process and posted a new blog entry about it: Read the latest update on this process

I’ve been working on converting all of my text based data to markdown to make it more portable.

I’ve found a great iOS app to use for my recipes, using Grocery App, which I covered yesterday.

Now the problem is that I need to get all my recipes out of Paprika 3 and into markdown. This post will cover that process as it unfolds, and provide the code needed if you come across the same problem.

The general plan

At this point I’ve only done a quick review of what options Paprika provides for an export:

  • HTML
  • Paprika Format

The HTML code generated wasn’t bad & I considered using pandoc, but I need to do a little additional formatting to get the data into the format Grocery App wants. And I like the format Grocery is using so I’m going all in with that.

So option two was Paprika Format, it turns out it isn’t too bad & should be easy to script.

What I know so far:

  • In Paprika 3 choose File -> Export…
  • Provide a name & location
  • Categories: All Recipes
  • Format: Paprika Recipe Format
  • Click Export

  • This will provide a single file My Recipes.paprikarecipes (plural)
  • CD to where this file was extracted
  • running the linux/macOS command file My\ Recipes.paprikarecipes on this tells us it is a Zip archive.
  • So we just need to run a simple unzip My\ Recipes.paprikarecipes to extract the file.
  • remove this file so it doesn’t cause future problems rm 'My Recipes.paprikarecipes'
  • We now have a whole bunch of *.paprikarecipe (singular) files, these are oddly gzip files
  • run gunzip to extract these gunzip *.paprikarecipe
  • make sure rename is installed: brew install rename
  • rename files to .gz from .paprikarecipe rename s/\.paprikarecipe/\.gz/g *.paprikarecipe
  • extract all the recipes gunzip *.gz
  • the files are now json format so rename them with the right extension rename s/$/\.json/g *
Tags: recipes code

Grocery - Smart Shopping List

Several years ago after migrating my data from service, to srevice, to service I decided I’d had enough of proprietary formats & was going to move all of my data to non proprietary format. For most all my stuff that has worked out to be markdown.

I had not yet found a good way to store recipes in a nice structure . I’d searched a few times over the years & hadn’t found what I wanted, then yesterday I happened across a github repo with some markdown recipe examples from the team that created Grocery App for iOS, iPadOS, watchOS.

The Format

Their format is dead simple, and super flexible, and best of all lets me put my recipes in the flow that I like of “do this steps with these things”.

You can see on their Github page for Grocery Recipe Format some example recipes, and the basic structure of a recipe:

# Title
## Header
- Ingredient
Step
> Note

This simple format makes it very simple to throw a recipe together like the below. It’s markdown so it’s easy to read without any special tools, and the thing that I really like is that it is portable so I’m not locked into a specific recipe database format.

When I started this adventure I was not looking for a new shopping list app, nor was I looking for a new recipe storage app. But it happens that this little app does both of these things very well, and since it reads markdown, and easily syncs my data from iCloud I can easily workout a workflow to keep the recipes in the app updated with my blog store.

The Shopping List

I’ll admit I have not actually used this app yet for shopping, but from the little bit of playing around I’ve done it looks like a really nice app for that.

The Recipe View

This is why I really liked this app, the recipe view is very simple and adds a lot of features from such a simple markdown format.

First it of course provides nice little check boxes so you can mark off each step and ingredient as you do it, but it also has a nice little marker you can use to note a timer. So just tapping the highlighted time, will start a timer, and then track multiple timers across multiple recipes.

There was only one small problem

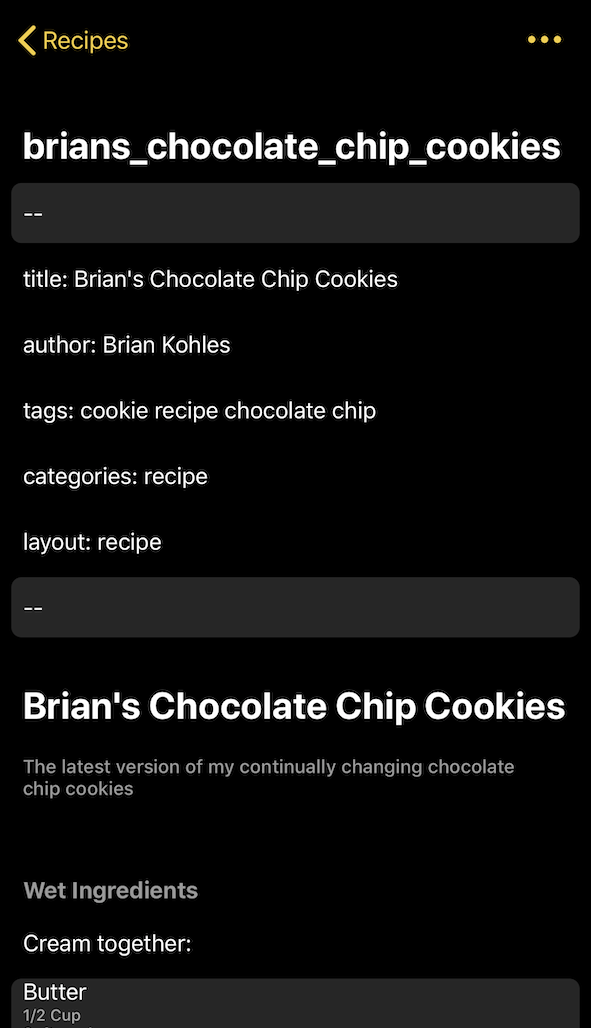
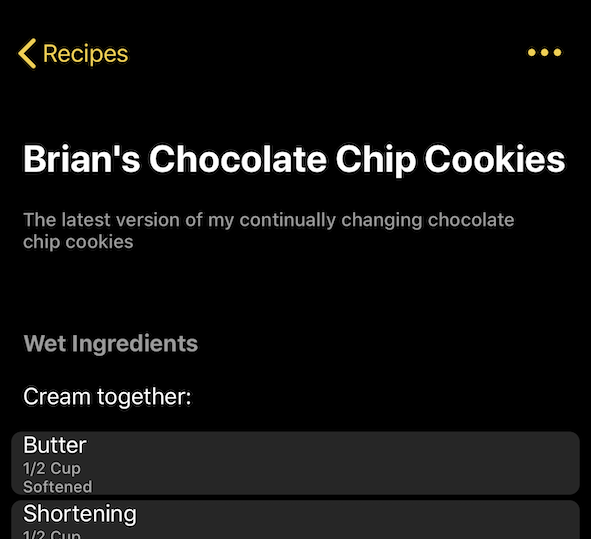
The app doesn’t currently support YAML front matter. Front matter is the stuff that goes at the top of a lot of file types used for a lot of things, that defines some additional meta data about your content. In my case it is use by Jekyll that runs my blog/wiki/recipe box. The front matter in the code below is the part between the lines of --- of my YAML/Markdown files or +++ for TOML files. I’ve sent the Grocery team a feature request to see if they can ignore this section of the file, so hopefully that will come in a future update.

Example Recipe

An example of the issue is below. For the below recipe if the front matter is included the Grocery recipe view looks like:
Removing the front matter & everything looks perfect:
---
title: Brian's Chocolate Chip Cookies
author: Brian Kohles
tags: cookie recipe chocolate chip
categories: recipe
layout: recipe
---

# Brian's Chocolate Chip Cookies

> The latest version of my continually changing chocolate chip cookies

## Wet Ingredients

Cream together:
- Butter | 1/2 Cup | Softened
- Shortening | 1/2 Cup | Butter Flavored
- Dark Brown Sugar | 220 G | 
- Sugar | 200 G | 

Add in the other wet ingredients:
- Eggs | 2 |
- Vanilla Extract | 1 1/2 t |

## Dry Ingredients

Add in all the dry ingredients & slowly mix together:
- Flour | 333 G | 
- Baking Soda | 1 tsp |
- Baking Powder | 1 tsp |

## Add mix ins

Mix in Chocolate Chips and anything else you like:
- Dark Chocolate Bar | 2 C | Cut into chunks

## Bake

Preheat over to 350º F (325º F fan assist) for 11 minutes [Baking Cookies].

> Cooking time may be 10-16 minutes depending on cookie size

## Other optional mix ins

> Some other Mix ins to try

- Heath Toffee Bits | 1 C | with or without chocolate
- Instant Espresso Powder | 1 T |
- Cinnamon | 1 T |
- Cayenne Pepper | 1/8 t |
Tags: code recipes

Node-RED - Low-code programming for event-driven applications

Their website sums it up best:

Node-RED is a programming tool for wiring together hardware devices, APIs and online services in new and interesting ways.

It provides a browser-based editor that makes it easy to wire together flows using the wide range of nodes in the palette that can be deployed to its runtime in a single-click.

Node-RED

Tags: code website

New Apple Mac Hardware - me guessing

There has been a lot of speculation lately about Apple releasing new Mac hardware that switches from an Intel processor to a ARM processor (like the A10x in the iPad Pro).

The discussion usually revolves around how the transition would work, would there be an emulator, would they announce the change @ WWDC (they did not), what will it take for devs to update their apps, etc.

I was thinking about this today and I think there is an answer that would make everyone happy. The current line of Macs are all very old, almost like Apple has been waiting a long time to make any updates. Almost as though they want to update them all at the same time. Or at least have a viable plan to update them all in a very short (less than 1 year) timeframe.

At WWDC Apple announced that the Mac would soon be able to run iOS apps. It is expected that these apps would need to be recompiled to run on Intel CPUs as currently used in the Mac. It is also expected that if Apple switches the Mac to an ARM chip that there would need to be emulation of some sort (like Rosetta Stone during the transition to Intel) to allow older Mac apps to continue to run.

What if neither is true initially. Apple doesn’t have to switch completely to ARM processors, what if they added additional hardware/software to allow an ARM processor to run the computer, but have an Intel co-processor for running old apps? There was a similar after market setup WAY back in the PowerPC days, you could buy a expansion card for your Mac (called a Power Card if I remember right), and that card was essentially a 386/486 PC on an expansion card. This allowed you to run windows inside a window on your Mac, almost as fast as an actual PC.

With Apple being in full control of their hardware and OS stack, why couldn’t they do the same thing, but modernized? You could run the full blown Mac OS on either the Intel or ARM CPU (maybe you get to choose may be Apple chooses for you), and then essentially any apps that need access to the other CPU could just run in its own window. There would of course have to be a controller to manage data between the two processors, but it would work similar to handing off processing load to the GPU. The additional CPU would do its work & then hand the data back to the main CPU for rendering, or it could literally just draw its data right back to its own window.

With Apple relying so heavily on APIs for everything the OS does I could see this being a completely hands off process that the system just handles with little to zero input by the developer.

As apps are updated they could be compiled to run on the new CPU and eventually everything would use the new CPU & Apple could remove the Intel CPU from future hardware builds. Eventually Apple drops Intel, Intel probably goes under as a result & hopefully MS has Windows for ARM at the same level as their x86 version.

AppleTV Secret Remote Combos

I was playing with the AppleTV (4th gen) the other day and accidentally triggered one of the developer tools, so I poked around a bit more & came up with the following combos.

The below are all done from the home screen

Play/Pause – hold for a few seconds

  • This will allow you to change audio output, this is helpful for switching to a previously paired set of bluetooth headphones. Found this one via johsherrod.net

Play/Pause + Volume Down

  • Hold for 3 seconds & release – This will save a “stackshot”, this is ued by developers for troubleshooting apps.
  • Hold for 6 seconds & release – Will create analytics & allow them to be shared (via air drop)

Play/Pause + Volume Up

  • Hold for 10 seconds & release – This will presumably take a screenshot. You can hear the screenshot sound, but I have not figured out where the screenshots end up.
  • Start remote pairing mode
  • Autoscan for new output settings

Home + volume up

  • Hold for about 10 seconds & then release – send diagnostic logs to Apple

Play + Menu

  • Hold for about 10 seconds – force a reboot